Pihole and DoH using DNScrypt-proxy on a UDM Pro
I installed Pihole in UnifiOS running on my UDM Pro last year, adding additional security of DNS over HTTP (DoH).
However, a short 2 months later, Cloudflare announced the cloudflared proxy-dns command, which allowed DoH to work, would be removed from all new cloudflared releases, starting on February 2, 2026.
This change is being made to enhance security and address a potential vulnerability in an underlying DNS library.
Any older cloudflared containers would continue to work with DoH, but after February 2, 2026, it would stop working.
Easiest solution that I found was to replace cloudflared with dnscrypt-proxy.
Most of the information below is copied from the post above, but modified to use dnscrypt-proxy.
Background
Since firmware version 3.0 on the Unifi UDM/UDM Pro, podman is no longer available, so we had to use another method to create a container.
We now use systemd-nspawn to create a container that we will run Pihole and DNScrypt-proxy, in order to use DNS over HTTPS (DoH).
This new guide installs/configures a container in a UDM Pro, installs/configures Pihole in that container, and finally, installs/configures dnscrypt-proxy in that container.
Installation overview
There are 4 steps, if starting from scratch:
- Create the container.
- Configure the container.
- Install Pi-hole in the container.
- Install dnscrypt-proxy service in the container.
NOTE: If simply migrating from cloudflared to dnscrypt-proxy, we will need to stop/disable the cloudflared service before installing dnscrypt-proxy. If you also already have a container created/configured, and Pihole installed, skip to the section labeled Stop and disable the cloudflared service (if configured) below.
Create the container
All commands will be run using ssh, logging in as a user with root access.
- Install systemd-container and debootstrap
apt -y install systemd-container debootstrap
- Use
debootstrapto create a directory called debian-custom with a base debian system in /data/custom/machines
mkdir -p /data/custom/machines
cd /data/custom/machines
debootstrap --include=systemd,dbus unstable debian-custom
- Bring up a shell on this container, set the root password, and enable the networking service. Run each command one-by-one.
systemd-nspawn -M debian-custom -D /data/custom/machines/debian-custom
passwd root
systemctl enable systemd-networkd
echo "nameserver 192.168.1.5" > /etc/resolv.conf
echo "debian-custom" > /etc/hostname
exit
Note that the 192.168.1.5 is the IP of my other Pi-hole
Configure the container
- Link the container to /var/lib/machines so we can control it with
machinectl
mkdir -p /var/lib/machines
ln -s /data/custom/machines/debian-custom /var/lib/machines/
- Create a debian-custom.nspawn file in /etc/systemd/nspawn to configure parameters for the container (such as network, bind mounts, etc).
mkdir -p /etc/systemd/nspawn
My /etc/systemd/nspawn/debian-custom.nspawn file:
[Exec]
Boot=on
ResolvConf=off

[Network]
MACVLAN=br5
- Boot up the container and see if it works
machinectl start debian-custom
machinectl enable debian-custom
machinectl status debian-custom
Press
qto exit the status
Optional: Configure container to use isolated network
If you haven't installed anything from the unifios-utilities, or have inter-VLAN restrictions, I would suggest following these sections:
While I do have inter-VLAN restrictions, I also have those isolated VLANs configured to use public DNS servers and I've been running unifios-utilites for a while.
Install Pi-hole in the container
- Spawn a shell to your container
machinectl shell debian-custom
- Run the automated install command from the pihole documentation and follow the prompts. Refer to the pihole documentation for more details.
apt -y install curl
curl -sSL https://install.pi-hole.net | PIHOLE_SKIP_OS_CHECK=true bash
As with any script you download from the Internet, make sure you are aware and understand what that script does before running it !
- You must use PIHOLE_SKIP_OS_CHECK=true so pihole can be installed on Debian unstable.
- After installation, the debian-custom container has a size of 611 MB after running
apt cleanto delete the package cache.
-
When the install says a static IP is needed, press Continue.
-
Select an upstream DNS provider on the next page, or add your custom DNS provider. Note all these options can be changed later in the admin panel, so you don't need to be perfect here.
-
In the next page, choose "Yes" to include the default list or "No" to not include any block lists at install (you will have to install your own later in that case).
-
On the next page, choose "Yes" to install the Admin web interface, then "Yes" on the next page to install the default web server that pihole uses.
-
On the next two pages, click Yes to enable Query Logging, and enable "Show everything". You can disable query logging or hide information from the log if you prefer.
-
Once the install is finished, it will tell you what your pihole IP and admin password is.
-
You can either use the current admin password the installation gave you, or run
pihole -a -pto update the password. -
You should now be able to access the pihole admin page at https://10.0.0.5/admin.
- To update the pihole container, from within the container:
PIHOLE_SKIP_OS_CHECK=true pihole -up
Stop and disable the cloudflared service (if configured)
If moving from cloudflared >>>> dnscrypt-proxy, we need to first stop and disable the cloudflared service, to prevent a port conflict
From within the container
systemctl disable --now cloudflared
Install and configure the dnscrypt-proxy service
- Spawn a shell to your container
machinectl shell debian-custom
- Install
wget
apt install wget -y
- Download the latest
dnscrypt-proxybinary for amd64, extract the files, and rename the extracted directory
wget https://github.com/DNSCrypt/dnscrypt-proxy/releases/download/2.1.15/dnscrypt-proxy-linux_arm64-2.1.15.tar.gz
tar xfvz xfvz dnscrypt-proxy-linux_arm64-2.1.15.tar.gz
mv ./linux-arm64 ./dnscrypt-proxy
- Copy and modify the dnscrypt-proxy.toml file
cp dnscrypt-proxy/example-dnscrypt-proxy.toml dnscrypt-proxy/dnscrypt-proxy.toml
Edit these two lines so they match the following
server_names = ['cloudflare']
listen_addresses = ['127.0.0.1:5053']
The server_names will only use Cloudflare DNS servers and the listen_addresses will only listen on the loopback (127.0.0.1) address.
- Install and start the
dnscrypt-proxyservice
./dnscrypt-proxy -service install
./dnscrypt-proxy -service start
Test
We will run some tests to ensure that DNS works, and that DoH is being used for the DNS requests.
Enable query logging for dnscrypt-proxy
For testing purposes, we will enable query logging for dnscrypt-proxy, which is disabled by default.
From within the container, edit the dnscrypt-proxy.toml file, and uncomment the following line:
file = 'query.log'
Restart the dnscrypt-proxy service, from within the container
./dnscrypt-proxy -service restart
DNS queries sent to dnscrypt-proxy will now be logged in the query.log file.
Perform a DNS query against the dnscrypt-proxy service
From within the container, query using localhost (127.0.0.1) as the DNS server
dig @127.0.0.1 -p 5053 www.test.com

; <<>> DiG 9.20.11-1-Debian <<>> @127.0.0.1 -p 5053 www.test.com
; (1 server found)
;; global options: +cmd
;; Got answer:
;; ->>HEADER<<- opcode: QUERY, status: NOERROR, id: 3608
;; flags: qr rd ra; QUERY: 1, ANSWER: 3, AUTHORITY: 0, ADDITIONAL: 1

;; OPT PSEUDOSECTION:
; EDNS: version: 0, flags:; udp: 1232
;; QUESTION SECTION:
;www.test.com.			IN	A

;; ANSWER SECTION:
www.test.com.		2400	IN	CNAME	customers.atom.com.
customers.atom.com.	2400	IN	A	104.20.26.89
customers.atom.com.	2400	IN	A	172.66.170.130

;; Query time: 100 msec
;; SERVER: 127.0.0.1#5053(127.0.0.1) (UDP)
;; WHEN: Thu Apr 09 10:31:26 MDT 2026
;; MSG SIZE  rcvd: 102
Perform a DNS query against the Pihole IP
Use a computer on the same network, but not the UDM Pro itself, to verify it works correctly.
dig @10.0.0.5 www.yahoo.com

; <<>> DiG 9.10.6 <<>> @10.0.0.5 www.yahoo.com
; (1 server found)
;; global options: +cmd
;; Got answer:
;; ->>HEADER<<- opcode: QUERY, status: NOERROR, id: 19403
;; flags: qr rd ra; QUERY: 1, ANSWER: 3, AUTHORITY: 0, ADDITIONAL: 1

;; OPT PSEUDOSECTION:
; EDNS: version: 0, flags:; udp: 1232
;; QUESTION SECTION:
;www.yahoo.com.			IN	A

;; ANSWER SECTION:
www.yahoo.com.		2304	IN	CNAME	me-ycpi-cf-www.g06.yahoodns.net.
me-ycpi-cf-www.g06.yahoodns.net. 2304 IN A	69.147.71.248
me-ycpi-cf-www.g06.yahoodns.net. 2304 IN A	69.147.71.247

;; Query time: 11 msec
;; SERVER: 10.0.0.5#53(10.0.0.5)
;; WHEN: Thu Apr 09 08:33:24 MDT 2026
;; MSG SIZE  rcvd: 119
From the /var/log/pihole/pihole.log file in the container, we see the above DNS query from the client, the DNS query being sent to dnscrypt-proxy and the resulting DNS response
Apr  9 08:33:24 dnsmasq[120]: query[A] www.yahoo.com.com from 192.168.1.30
Apr  9 08:33:24 dnsmasq[120]: forwarded www.yahoo.com.com to 127.0.0.1#5053
Apr  9 08:33:24 dnsmasq[120]: reply www.yahoo.com.com is 69.147.71.248
Apr  9 08:33:24 dnsmasq[120]: reply www.yahoo.com.com is 69.147.71.247
From the dnscrypt-proxy/query.log file in the container, we see the above DNS query being processed by dnscrypt-proxy
[2026-04-09 08:33:24] 127.0.0.1 www.yahoo.com A PASS 5ms cloudflare
Disable query logging for dnscrypt-proxy
Now that we have verified both pihole and dnscrypt-proxy are working correct, we will disable the logging of DNS queries for dnscrypt-proxy
From within the container, edit the dnscrypt-proxy.toml file, and comment out the following line:
What you should have after commenting out the line:
#file = 'query.log'
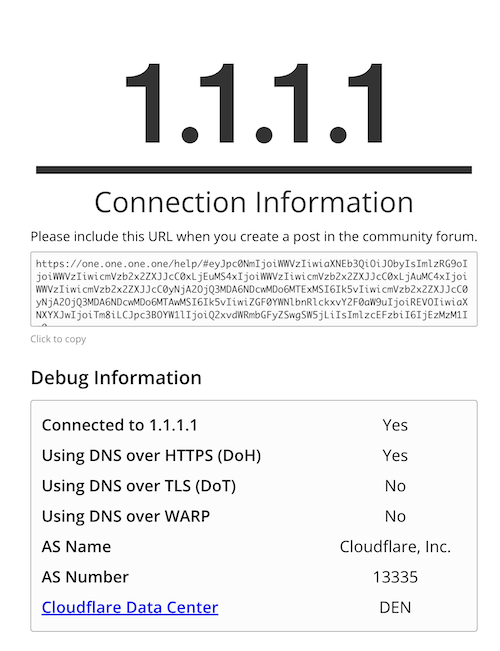
Check to ensure that DoH is being used
From a web browser, that is configured to use the above Pihole as it's DNS server, browse to https://one.one.one.one/help/ and check to see if Using DNS over HTTPS (DoH) reports as Yes
References
Github / unifi-utilities / unifios-utilities / nspawn-container
https://github.com/unifi-utilities/unifios-utilities/tree/main/nspawn-container
Github / unifi-utilities / unifios-utilities / nspawn-container / examples / pihole
https://github.com/unifi-utilities/unifios-utilities/tree/main/nspawn-container/examples/pihole
Cloudflare Docs - cloudflared proxy-dns command will be removed starting February 2, 2026
https://developers.cloudflare.com/changelog/post/2025-11-11-cloudflared-proxy-dns/
Github - DNSCrypt / dnscrypt-proxy
https://github.com/DNSCrypt/dnscrypt-proxy
Pihole Docs - Configuring DNS-Over-HTTPS using dnscrypt-proxy
https://docs.pi-hole.net/guides/dns/dnscrypt-proxy/