Pi-hole 6, DoH, and Docker in 2026
I upgraded my Pihole running in Docker last year, adding additional security of DNS over HTTP (DoH):
https://www.nodinrogers.com/post/2025-09-15-pihole6-doh-docker/
However, a short 2 months later, Cloudflare announced the cloudflared proxy-dns command, which allowed DoH to work, would be removed from all new cloudflared releases, starting on February 2, 2026.
This change is being made to enhance security and address a potential vulnerability in an underlying DNS library.
Any older cloudflared containers would continue to work with DoH, but after February 2, 2026, it would stop working.
Easiest solution that I found was to replace cloudflared with dnscrypt-proxy.
Most of the information below is copied from the post above, but modified to use dnscrypt-proxy.
DNS query/response basics
You open your web browser and go to https://yahoo.com.
Your computer has no idea what a yahoo.com is, but it does know what an IP address is, and DNS translates hostnames (yahoo.com) to an IP address.
Your computer, under the hood, uses the IP address associated with yahoo.com and sends you on your merry way.
The problem with traditional DNS
However, DNS queries/responses are sent in plain text by default.
Easy to troubleshoot, but also easy to see/manipulate for any bad actor.
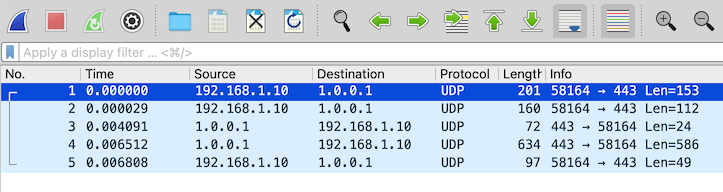
As you can see from the packet capture snippet below, DNS queries/responses are very easy to read.

No big deal, but you have some Internet Service Providers (ISP) that track this information, and sell it to advertisers.
Worse, unencrypted DNS traffic can be intercepted and misdirected.
For example, if you wanted to go to your online bank website, and a bad actor intercepted the DNS query, they would provide an IP address that would send you to a website that looks like your bank's website, but is actually a fraudulent website, trying to extract personal information.
Hello DNS over HTTPS (DoH)
To prevent us from being tracked, and to secure out internet activity, we can implement DNS over HTTPS (DoH), which sends DNS queries/responses over HTTPS (encrypted).
Someone trying to snoop in on your DNS queries/responses after that is only going to see HTTP/3 (UDP on port 443) data:
Traffic flow with DNS using DoH
Locally, your computer will send an unencrypted DNS request to the DNS server (Pi-hole), and Pi-hole, assuming it doesn't have an entry for that hostname already, will send an encrypted DNS (via dnscrypt-proxy, using DoH) query to our configured upstream DNS server (Cloudflare).
DNS queries will following this traffic pattern:
-
Client >>> local DNS server (Pi-hole), unencrypted DNS query, using port 53
-
Local DNS server (Pi-hole) >>> upstream DNS server (Cloudflare), encrypted DNS query, using port 443
-
Upstream DNS server (Cloudflare) >>> Local DNS server (Pi-hole), encrypted DNS response, using port 443
-
Local DNS server (Pi-hole), unencrypted DNS response, using port 53
Implement DoH for Pi-hole in Docker
There are three basic steps to install Pihole and dnscrypt-proxy in Docker:
- Install Pihole
- Install
dnscrypt-proxy - Configure Pihole to use
dnscrypt-proxyto send DNS requests
Install Pihole in Docker
This was my baseline Pi-hole, version 6, compose.yaml file:
services:
  pihole:
    container_name: pihole
    hostname: pihole-1
    # image: pihole/pihole:latest
    image: pihole/pihole:2025.07.1
    ports:
      - "53:53/tcp"
      - "53:53/udp"
      - "67:67/udp"
      - "8880:80/tcp"
      - "8443:443/tcp"
    environment:
      TZ: 'America/Denver' #change to your local timezone
    networks:
      Internal:
        ipv4_address: 172.28.0.5
      net192:
        ipv4_address: 192.168.1.5
    volumes:
       - './etc-pihole/:/etc/pihole/'
       - './etc-dnsmasq.d/:/etc/dnsmasq.d/'
    dns:
      - 127.0.0.1
      - 1.1.1.1
    restart: unless-stopped
When initially deploying a new service, I specify the latest version, but after I get it working, I specify a specific tag, which is why you see pihole/pihole:latest and pihole/pihole:2025.07.01
Install dnscrypt-proxy in Docker
Adding the dnscrypt-proxy container and settings to the existing compose.yaml file for Pi-hole:
  dnscrypt:
    container_name: dnscrypt-proxy
#    image: klutchell/dnscrypt-proxy:latest
    image: klutchell/dnscrypt-proxy:v2.1.15
    volumes:
      - './dnscrypt-proxy:/config'
    ports:
      - "5053:53/tcp"
      - "5053:53/udp"
    restart: unless-stopped
    networks:
      Internal:
Create and edit the dnscrypt-proxy.toml file
The dnscrypt-proxy.toml file is necessary for dnscrypt-proxy to function, and based on the configuration above, will reside in the dnscrypt-proxy directory.
In the same directory as the compose.yaml file (at least in my setup, you can change this...)
Grab a copy of the dnscrypt-proxy.toml file, while creating the dnscrypt-proxy directory
wget -P dnscrypt-proxy https://raw.githubusercontent.com/klutchell/dnscrypt-proxy-docker/refs/heads/main/config/dnscrypt-proxy.toml
In the dnscrypt-proxy/dnscrypt-proxy.toml file, edit, or uncomment the following lines
server_names = ['cloudflare']
https3 = true
Change owner on the dnscrypt-proxy directory (optional)
This step is optional, as dnscrypt-proxy will function 100% without these changes, especialy as we hardcoded using Cloudflare DNS servers and support for HTTP/3.
However, if you want to use any other other (many) features of dnscrypt-proxy, or you're somewhat of a perfectionist (like myself), you will need to made the owner/permission changes.
By default, the dnscrypt-proxy directory is owned by the user installing it, in my case, the user tom.
However, from documentation on https://github.com/klutchell/dnscrypt-proxy-docker
# note that the files in the configuration directory '/path/to/config' must be
# readable by world, or owned by nobody:nogroup, and the directory itself must be
# writeable by world, or owned by nobody:nogroup
So that dnscrypt-proxy can write to the directory, we need to change the owner, while retaining read/write for ourselves.
sudo chown -R nobody dnscrypt-proxy
Now the directory, and contents, are owned by the nobody user, while we retain read/write permissions
ls -ld dnscrypt-proxy
drwxrwxr-x 2 nobody tom 7 Apr 9 10:26 dnscrypt-proxy
After the dnscrypt-proxy container is running, we will have a number of new files, owned by the nobody user and the GID of the nogroup group
ls -l dnscrypt-proxy/*
-rw-rw-r-- 1 nobody tom    36279 Apr  9 10:08 dnscrypt-proxy/dnscrypt-proxy.toml
-rw-r--r-- 1 nobody 65533 166617 Apr  9 10:09 dnscrypt-proxy/public-resolvers.md
-rw-r--r-- 1 nobody 65533    307 Apr  9 10:09 dnscrypt-proxy/public-resolvers.md.minisig
-rw-r--r-- 1 nobody 65533  62677 Apr  9 10:09 dnscrypt-proxy/relays.md
-rw-r--r-- 1 nobody 65533    297 Apr  9 10:09 dnscrypt-proxy/relays.md.minisig
Again, these changes are totally optional, and dnscrypt-proxy will function 100% without them being made.
Configure Pihole to use dnscrypt-proxy to send DNS requests
Before using DoH, Pi-hole was configured to use Cloudflare's public DNS servers, 1.1.1.1 and 1.0.0.1.
Once adding the dnscrypt-proxy container, we need to configure Pi-hole to use it to use DoH for the upstream DNS requests.
We can configure Pi-hole to use this either using a Docker environment variable or set it in the web UI.
Set upstream DNS server as a Docker environment variable
Under the pihole service definition, add the variable (in Pi-hole 6.x) FTLCONF_dns_upstreams:
FTLCONF_dns_upstreams: dnscrypt-proxy#5053
This configures Pi-hole to use the dnscrypt-proxy server by name, and port 5053. As the pihole and dnscrypt-proxy containers are both on the 'Internal' network, this works.
The major downside to using a Docker environment variable is that you can NOT change it in the web UI afterwords. You have to change it using the Docker environment variable, or remove it and add it using the web UI.
Set upstream DNS server in the Pi-hole web UI
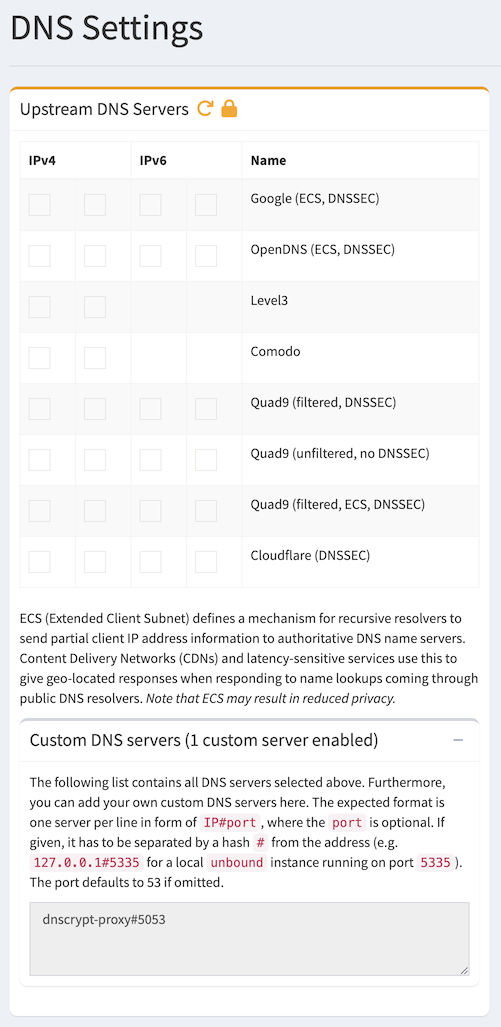
Configure Pi-hole to use the local cloudflared service as the upstream DNS server by specifying dnscrypt-proxy#5053 as the Custom DNS (IPv4).
Settings >>> DNS, under Upstream DNS Servers, uncheck all DNS servers.
Under Custom DNS servers, add:
dnscrypt-proxy#5053
Click Save & Apply at the bottom.
Testing DNS
Now that everything is configured and running, we need to test to make sure that DNS works, and our DNS queries, when sent to an external DNS server (Cloudflare) are encrypted (via DoH).
Enable query logging for dnscrypt-proxy
For verification purposes, we will temporarily enable query logging in dnscrypt-proxy
Edit the dnscrypt-proxy.toml file, and uncomment this line:
file = 'query.log'
Restart the dnscrypt-proxy container:
docker restart dnscrypt-proxy
DNS queries sent to dnscrypt-proxy will now be logged in the dnscrypt-proxy/query.log file.
Testing DNS query against dnscrypt-proxy
We will test DNS queries directly against the dnscrypt-proxy container, from within the pihole container.
docker exec -it pihole /bin/bash
pihole-2:/# dig @dnscrypt -p 5053 www.yahoo.com

; <<>> DiG 9.20.10 <<>> @dnscrypt -p 5053 www.yahoo.com
; (1 server found)
;; global options: +cmd
;; Got answer:
;; ->>HEADER<<- opcode: QUERY, status: NOERROR, id: 48502
;; flags: qr rd ra; QUERY: 1, ANSWER: 3, AUTHORITY: 0, ADDITIONAL: 1

;; OPT PSEUDOSECTION:
; EDNS: version: 0, flags:; udp: 1232
;; QUESTION SECTION:
;www.yahoo.com.			IN	A

;; ANSWER SECTION:
www.yahoo.com.		2400	IN	CNAME	me-ycpi-cf-www.g06.yahoodns.net.
me-ycpi-cf-www.g06.yahoodns.net. 2400 IN A	69.147.71.248
me-ycpi-cf-www.g06.yahoodns.net. 2400 IN A	69.147.71.247

;; Query time: 8 msec
;; SERVER: 172.28.0.130#5053(dnscrypt) (UDP)
;; WHEN: Fri Apr 10 11:03:54 MDT 2026
;; MSG SIZE  rcvd: 119
From the dnscrypt-proxy/query.log file, we see the above DNS query being processed by dnscrypt-proxy
[2026-04-10 11:03:54] 172.28.0.5 www.yahoo.com A PASS 6ms cloudflare
Testing DNS query against Pihole
This will be a full test, of what we can expect to see once implemented.
From another computer on the same network, submit a DNS query against pihole
dig @192.168.1.5 www.example.com

; <<>> DiG 9.10.6 <<>> @192.168.1.100 www.example.com
; (1 server found)
;; global options: +cmd
;; Got answer:
;; ->>HEADER<<- opcode: QUERY, status: NOERROR, id: 44444
;; flags: qr rd ra; QUERY: 1, ANSWER: 2, AUTHORITY: 0, ADDITIONAL: 1

;; OPT PSEUDOSECTION:
; EDNS: version: 0, flags:; udp: 1232
;; QUESTION SECTION:
;www.example.com.		IN	A

;; ANSWER SECTION:
www.example.com.	2400	IN	A	104.20.23.154
www.example.com.	2400	IN	A	172.66.147.243

;; Query time: 18 msec
;; SERVER: 192.168.1.5#53(192.168.1.5)
;; WHEN: Fri Apr 10 11:08:02 MDT 2026
;; MSG SIZE  rcvd: 76
From /var/log/pihole/pihole.log we see the DNS query come in, get forwarded to dnscrypt-proxy, then the DNS response:
Apr 10 11:08:02 dnsmasq[53]: query[A] www.example.com from 192.168.1.30
Apr 10 11:08:02 dnsmasq[53]: forwarded www.example.com to 172.28.0.130#5053
Apr 10 11:08:02 dnsmasq[53]: reply www.example.com is 104.20.23.154
Apr 10 11:08:02 dnsmasq[53]: reply www.example.com is 172.66.147.243
From the dnscrypt-proxy/query.log file:
[2026-04-10 11:08:02] 172.28.0.5 www.example.com A PASS 5ms cloudflare
A packet capture, taken on the Docker host, we can see the traffic going from the virtual interface (veth74d8cff) to the bridge interface (br-9a6029079ace), then finally out a physical interface (enp1s0).
We can tell it is HTTP/3 for the DoH traffic, as it shows up as UDP traffic on port 443.
11:08:02.434084 veth74d8cff P   IP 172.28.0.130.39899 > 1.0.0.1.443: UDP, length 41
11:08:02.434084 br-9a6029079ace In  IP 172.28.0.130.39899 > 1.0.0.1.443: UDP, length 41
11:08:02.434163 enp1s0 Out IP 192.168.1.10.39899 > 1.0.0.1.443: UDP, length 41
The DNS response, from Cloudflare's 1.0.0.1 DNS server
11:08:02.437430 enp1s0 In  IP 1.0.0.1.443 > 192.168.1.10.39899: UDP, length 24
11:08:02.437470 br-9a6029079ace Out IP 1.0.0.1.443 > 172.28.0.130.39899: UDP, length 24
11:08:02.437478 veth74d8cff Out IP 1.0.0.1.443 > 172.28.0.130.39899: UDP, length 24
Disable query logging for dnscrypt-proxy
Now that testing is done, we need to disable DNS query logging for dnscrypt-proxy
Edit the dnscrypt-proxy.toml file, and comment out this line:
# file = 'query.log'
Restart the dnscrypt-proxy container:
docker restart dnscrypt-proxy
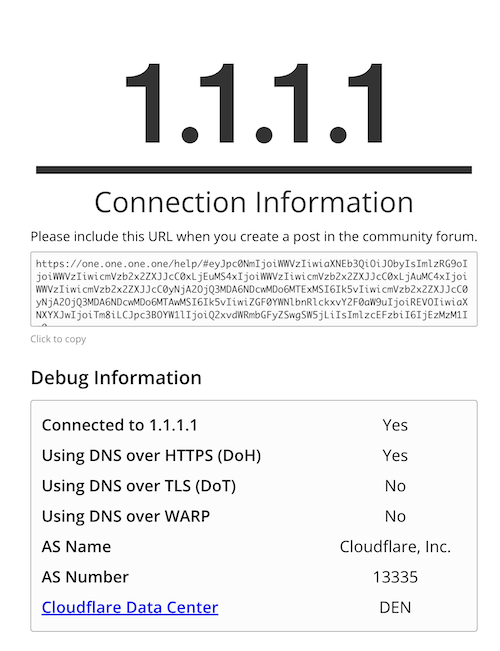
Final check from a web browser
From a web browser, that is configured to use the above Pihole as it's DNS server, browse to https://one.one.one.one/help/ and check to see if Using DNS over HTTPS (DoH) reports as Yes
Final compose.yaml file
I'm also using Nebula Sync to sync data between my two Pihole instances, so the final compose.yaml file looks like this:
services:
  pihole:
    container_name: pihole
    hostname: pihole-1
    image: pihole/pihole:2025.07.1
    ports:
      - "53:53/tcp"
      - "53:53/udp"
      - "8880:80/tcp"
      - "8443:443/tcp"
    environment:
      TZ: 'America/Denver' #change to your local timezone
      WEBPASSWORD: 'Mysecretpassword1!'

      # Variable for custom DNS servers, formerly set in the web UI
      # Since both pihole and dnscrypt-proxy are both in the 'Internal' network, we can refer to the dnscyrpt-proxy by name
      FTLCONF_dns_upstreams: dnscrypt-proxy#5053

    networks:
      # I added pihole to the 'Internal' network to make it easier to monitor from things like uptime-kuma, etc...
      Internal:
        ipv4_address: 172.28.0.5
      net192:
        ipv4_address: 192.168.1.5

    volumes:
      # The 'etc-pihole' and 'etc/dnsmaq.d' directories are in the '/mnt/configs/pihole/'
      # directory, to keep my home directory a bit more tidy.
       - './etc-pihole/:/etc/pihole/'
       - './etc-dnsmasq.d/:/etc/dnsmasq.d/'
    dns:
      - 127.0.0.1
      - 1.1.1.1
    restart: unless-stopped

  nebula-sync:
    # image: ghcr.io/lovelaze/nebula-sync:latest
    image: ghcr.io/lovelaze/nebula-sync:v0.11.1
    container_name: nebula-sync
    environment:
    - TZ=America/Denver
    - PRIMARY=http://10.0.0.5|Mysecretpassword1!
    - REPLICAS=http://192.168.1.5|Mysecretpassword1!
    - FULL_SYNC=true
    - RUN_GRAVITY=true
    - CRON=0 * * * *

  dnscrypt:
    container_name: dnscrypt-proxy
#    image: klutchell/dnscrypt-proxy:latest
    image: klutchell/dnscrypt-proxy:v2.1.15
    volumes:
      - './dnscrypt-proxy:/config'
      - '/etc/localtime:/etc/localtime:ro'
    ports:
      - "5053:53/tcp"
      - "5053:53/udp"
    restart: unless-stopped
    networks:
      Internal:

networks:
  Internal:
    external: true
  net192:
    external: true