Running Pi-hole on a UDM Pro
I have a Pi-hole Docker container running on my NAS, but DNS functionality is too important to have a single point of failure.
If something were to happen to my NAS, my home network would have no DNS resolution, which brings the network to it's knees.
I had been using a Raspberry Pi as my second DNS server, running Pi-hole, but the Raspberry Pi stopped working.
After discovering that Ubiquiti's Ultimate Dream Machine Pro (UDM Pro) allows you to run containers, and Pi-hole is one of the containers available, I decided to move my second Pi-hole to the UDM Pro.
Steps to configure the UDM Pro as a Pihole DNS blackhole server
Install udm-boot
To survive reboots and firmware updates on the UDM, Boostchicken has a package, udm-boot, that can be installed to automatically run a shell script(s) at S95 anytime your UDM starts / reboots.
-
SSH into your UDM Pro
-
Switch to the UniFi shell
unifi-os shell -
Download the boot scripts:
curl -L https://raw.githubusercontent.com/boostchicken-dev/udm-utilities/master/on-boot-script/packages/udm-boot_1.0.7_all.deb
Note: Check the below link for the latest version of the udm-boot package: https://github.com/unifi-utilities/unifios-utilities/tree/main/on-boot-script/packages
-
Install and enable the boot scripts:
dpkg -i udm-boot_1.0.7_all.deb systemctl enable udm-boot -
Exit out of the UniFi shell (this is important!):
exit
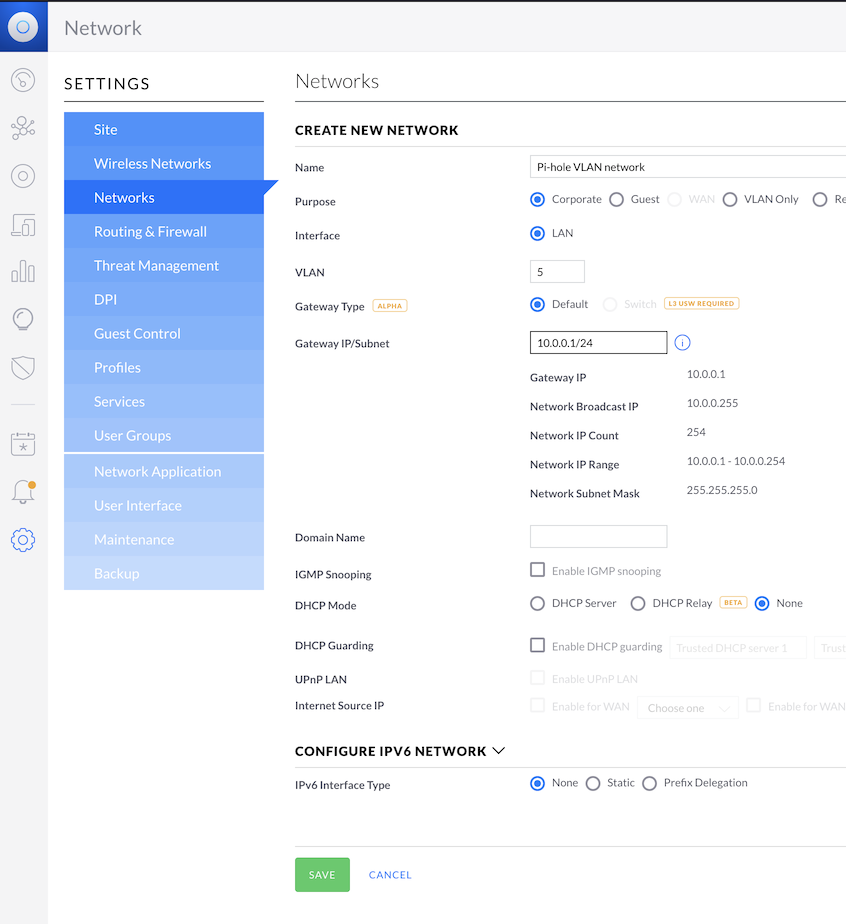
Create the network for Pi-Hole
In the UDM Legacy UI web GUI:
- Name: Pi-Hole VLAN network
- Purpose: Corporate
- VLAN: 5
- Gateway IP/Subnet: 10.0.0.1/24
- DHCP Mode: None
Create the /mnt/data/podman/cni directory
If this is the first podman container install, you may need to create the /mnt/data/podman/cni directory:
mkdir /mnt/data/podman/cni
Note: cni is Container Network Interface
Download and configure dns.conflist file
curl -L https://raw.githubusercontent.com/unifi-utilities/unifios-utilities/refs/heads/main/cni-plugins/20-dns.conflist -o /mnt/data/podman/cni/dns.conflist
Edit the file to meet your network configuration.
In my network, my main LAN network is 192.168.1.0/24, but I'm using 10.0.0.0/24 for this Pi-hole instance.
My /mnt/data/podman/cni/dns.conflist file:
{
  "cniVersion": "0.4.0",
  "name": "dns",
  "plugins": [
    {
      "type": "macvlan",
      "mode": "bridge",
      "master": "br5",
      "mac": "00:1c:b4:26:51:3d",
      "ipam": {
        "type": "static",
        "addresses": [
          {
            "address": "10.0.0.5/24",
            "gateway": "10.0.0.1"
          }
        ],
        "routes": [
          {"dst": "0.0.0.0/0"}
        ]
      }
    }
  ]
}
I changed the MAC address for this post.
Download and run 05-install-cni-plugins.sh script
curl -L https://raw.githubusercontent.com/boostchicken-dev/udm-utilities/master/cni-plugins/05-install-cni-plugins.sh -o /mnt/data/on_boot.d/05-install-cni-plugins.sh
chmod +x /mnt/data/on_boot.d/05-install-cni-plugins.sh
/mnt/data/on_boot.d/05-install-cni-plugins.sh
Downloading https://github.com/containernetworking/plugins/releases/download/v1.0.1/cni-plugins-linux-arm64-v1.0.1.tgz.sha256
Downloading https://github.com/containernetworking/plugins/releases/download/v1.0.1/cni-plugins-linux-arm64-v1.0.1.tgz
Pouring /mnt/data/.cache/cni-plugins/cni-plugins-linux-arm64-v1.0.1.tgz
Use podmanto create the dns network
podman network create dns
Download, configure, and run the 10-dns.sh script
curl -L https://raw.githubusercontent.com/boostchicken-dev/udm-utilities/master/dns-common/on_boot.d/10-dns.sh -o /mnt/data/on_boot.d/10-dns.sh
Edit the /mnt/data/on_boot.d/10-dns.sh file to meet your needs.
The only changes I made:
IPV4_IP="10.0.0.5"
IPV4_GW="10.0.0.1/24"
chmod +x /mnt/data/on_boot.d/10-dns.sh
/mnt/data/on_boot.d/10-dns.sh
Create the directory structure for persistent Pi-hole configuration
mkdir -p /mnt/data/etc-pihole
mkdir -p /mnt/data/pihole/etc-dnsmasq.d
Create and run the Pi-hole Docker container
podman run -d --network dns --restart always \
  --name pihole \
  -e TZ="America/Denver" \
  -v "/mnt/data/etc-pihole/:/etc/pihole/" \
  -v "/mnt/data/pihole/etc-dnsmasq.d/:/etc/dnsmasq.d/" \
  --dns=127.0.0.1 \
  --dns=1.1.1.1 \
  --hostname pi.hole \
  -e VIRTUAL_HOST="pi.hole" \
  -e PROXY_LOCATION="pi.hole" \
  -e ServerIP="10.0.0.5" \
  -e IPv6="False" \
  pihole/pihole:latest
If you get these errors, you can ignore them:
ERRO[0022] unable to get systemd connection to add healthchecks: dial unix /run/systemd/private: connect: no such file or directory
ERRO[0022] unable to get systemd connection to start healthchecks: dial unix /run/systemd/private: connect: no such file or directory
Set the Pi-hole password
podman exec -it pihole pihole -a -p MySecretPassword!
Post install changes
-
Update your router or DHCP server, to use the 10.0.0.5 DNS server.
-
You can access the Pi-hole web GUI at http://10.0.0.5
References
github - boostchicken-dev / udm-utilities / run-pihole https://github.com/boostchicken-dev/udm-utilities/tree/master/run-pihole