FreeNAS – Transmission jail with OpenVPN
I was running Transmission on a virtual machine, but that VM decided to stop working, so I decided it was time to move to something a little more isolated, and easier to rebuild if/when the time comes.
Doing some research, aka, poking around the internet using The Google, I found a decent guide, which I modified a bit, to meet my needs.
Rather than running a VM, and installing Transmission and a VPN, I moved to installing Transmission in a FreeNAS jail.
I also liked the idea of a kill switch when/if the VPN drops, or isn't connected, because some ISPs take a dim view of any torrent activity, even if completely legitimate. I'd rather not have to deal with the headache of trying to explain I'm downloading a Linux ISO, not some pirate movie.
Steps
-
Expose tun devices
This is the first gotcha. By default, FreeNAS 11.3 limits the devices jails can access in the host system. To allow jails to access tun devices, include the following pre-init task and reboot the server to allow the rule to take effect.
Tasks ⇒ Init/Shutdown Scripts ⇒ Add
devfs rule -s 4 add path 'tun*’ unhide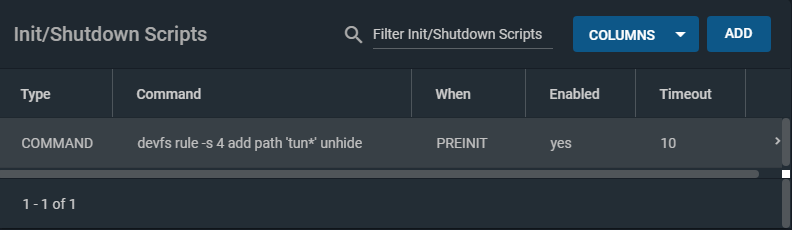
-
Install the Transmission plugin:
Plugins ⇒ Transmission ⇒ Install
The screen below will appear. Give the jail a name and accept the defaults for the moment. Click Save to continue.

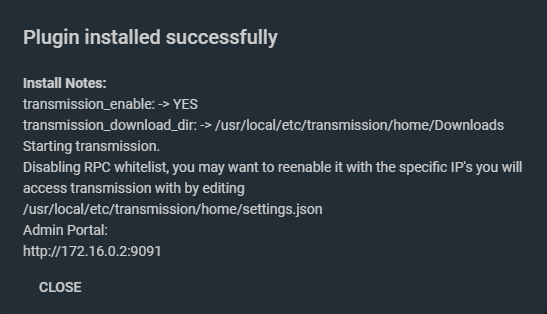
On completion of the installation of the Transmission plugin, a dialogue box similar to the one below will be displayed.<
-
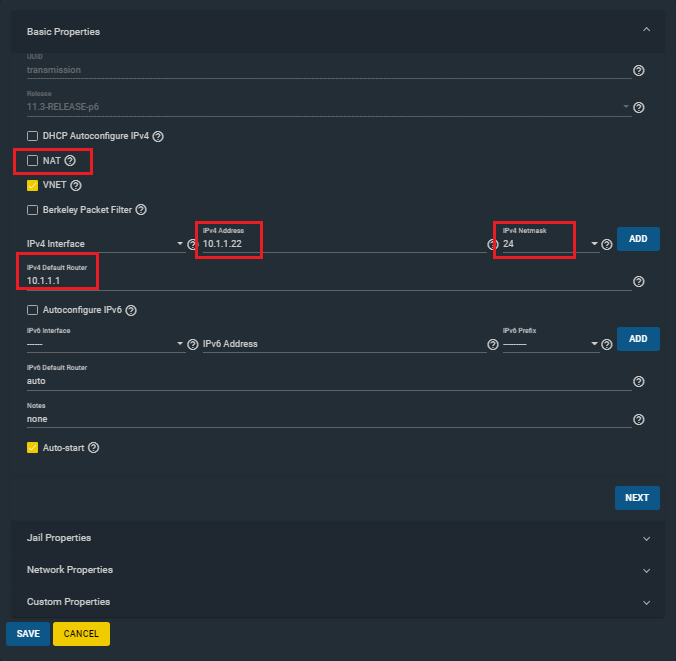
Configure the jail to use a static IP.
This is highly recommended, as this will be a headless box, and having the same IP to connect to via the web interfaces will make your life easier.
To modify the jail properties, the jail has to be stopped first.
Jails ⇒ transmission ⇒ Stop
Edit its properties.
Jails ⇒ transmission ⇒ Edit
Uncheck NAT.
Choose a unique IPv4 Address for the Transmission jail, specify your network IPv4 Netmask and your IPv4 Default Router. An example is shown below.
-
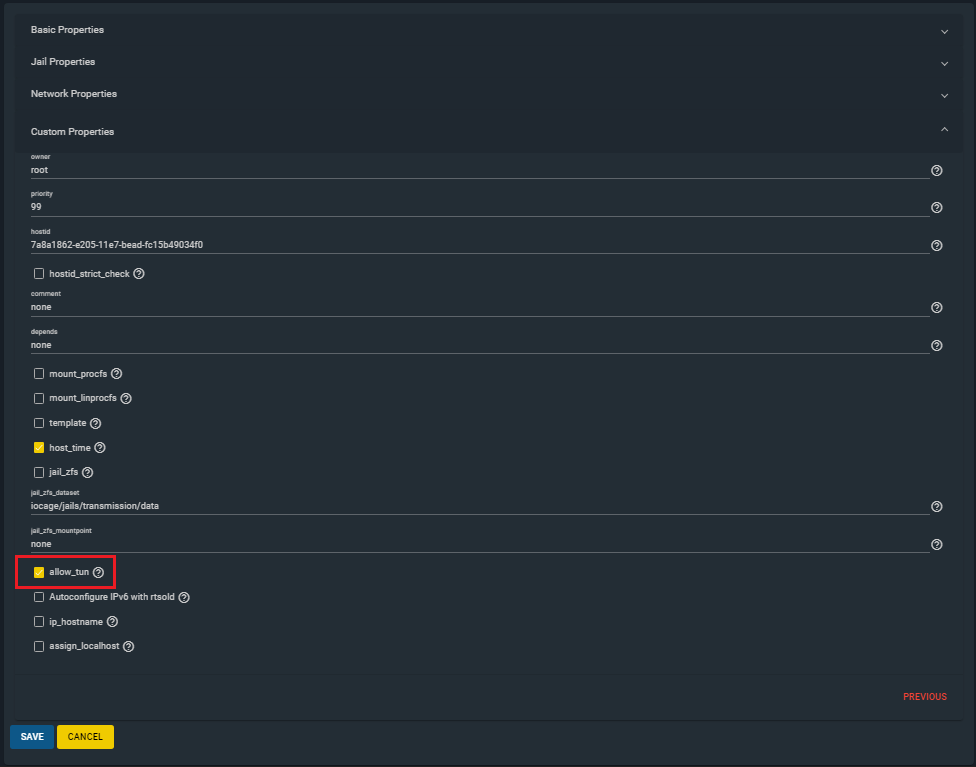
Allow the jail to create tun devices.
From the same page as above, click on Custom Properties
OpenVPN uses a tun device by default to make a virtual network. Check allow_tun and then click Save.
-
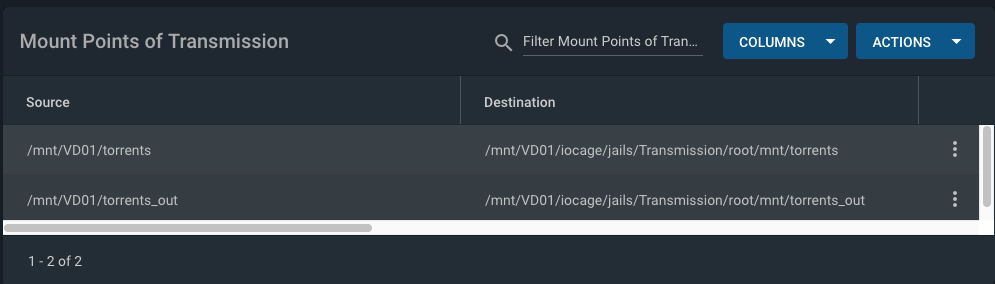
Set up additional storage
The Transmission jail is given access to storage outside the jail on the FreeNAS system. This allows Transmission to save data to a storage area outside the jail so that the data is accessible to the FreeNAS system (and elsewhere).
Additional storage is set up using mount points:
Jails ⇒ transmission ⇒ Mount points ⇒ Actions ⇒ Add
An example mapping is shown below.<
- Restart the jail with the new settings
Plugins ⇒ transmission ⇒ Start
-
Install required packages into the Transmission jail
Shell into the jail:
Jails ⇒ transmission ⇒ Shell
pkg updatepkg upgradepkg install bash openvpn wget vim -
Configure OpenVPN
Using
vi, append the following lines to /etc/rc.conf so that OpenVPN and the IP Firewall (IPFW) start when the jail starts, and configure the default torrent download directoryopenvpn_enable="YES" openvpn_configfile="/usr/local/etc/openvpn/openvpn.conf" firewall_enable="YES" firewall_script="/usr/local/etc/ipfw.rules” transmission_download_dir=“/mnt/torrents"Create the directory for OpenVPN configuration file:
mkdir /usr/local/etc/openvpnGet the necessary OpenVPN config files from Private Internet Access:
cd /tmpunzip openvpn-strong-tcp.zipcp us_denver.ovpn /usr/local/etc/openvpn/openvpn.ovpnCreate the pass.txt file, that contains your PIA username and password in it:
cat /usr/local/etc/openvpn/pass.txt
p12345678
mypassword1
Edit the /usr/local/etc/openvpn/openvpn.conf file and add pass.txt to the end of the line reading auth-user-pass
grep auth-user /usr/local/etc/openvpn/openvpn.ovpn
auth-user-pass pass.txt
Test the before and after enabling the VPN:
/usr/local/etc/rc.d/openvpn startIf not, stop the openvpn service, then run it manually:
openvpn stopopenvpn --config /usr/local/etc/openvpn startTroubleshoot any issues and re-test.
-
Configure the IPFW killswitch:
Run the following command:
ifconfig | grep "tun.:"
tun0: flags=8051<UP,POINTTOPOINT,RUNNING,MULTICAST> metric 0 mtu 1500
It should show a tun device, which is the VPN
tunnel. Take note of the device id (tun0 in this example).Contents of the /usr/local/etc/ipfw.rules file:
#!/bin/bash
ipfw -q -f flush
cmd="ipfw -q add"
vpn="tun0"
$cmd 00001 allow all from any to any via lo0
$cmd 00010 allow all from any to any via $vpn
$cmd 00101 allow all from me to 10.1.1.0/24 uid transmission
$cmd 00102 allow all from 10.1.1.0/24 to me uid transmission
$cmd 00103 deny all from any to any uid transmission
If your device id is different than tun0, change the parameter vpn to use the the correct device id.
Change the 10.10.1.0/24 to whatever your personal network is set up to.
-
Test the IPFW killswitch
Start the firewall:
service ipfw startCheck the make sure the firewall rule list from step #9 loaded:
ipfw listRestart the Transmission plugin:
Plugins ⇒ transmission ⇒ Restart
Shell back into the Transmission jail:
Jails ⇒ transmission ⇒ Shell
Test the firewall by downloading a large torrent file (I used a torrent of an Ubuntu ISO), and stopping the OpenVPN service during the download.
service openvpn stopIf the firewall is working, downloading should stop.
Once it does, start OpenVPN again and downloading should resume.
service openvpn start
References
Basil's Tech Diary - FreeNAS 11.3 + Transmission plugin + OpenVPN + AirVPN + IPFW Killswitch https://blog.udance.com.au/2020/02/14/freenas-11-3-transmission-openvpn-airvpn-ipfw-killswitch/
TrueNAS forums - openvpn issues in new jails after 11.1 https://www.ixsystems.com/community/threads/openvpn-issues-in-new-jails-after-11-1.59828/#post-426435
Private Internet Access - Linux - Installing OpenVPN through the Terminal https://www.privateinternetaccess.com/helpdesk/guides/linux/linux-installing-openvpn-through-the-terminal